
Last Updated: November 28, 2016
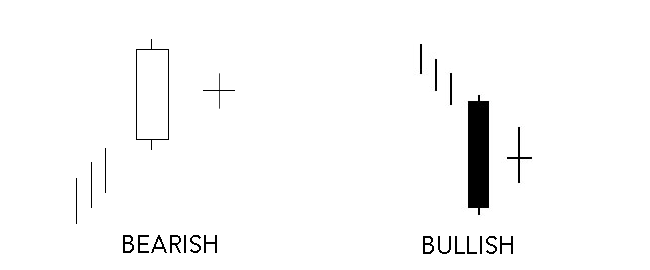
You know what a doji looks like, right? And I bet you’re familiar with the Harami, another essential signal, as well. If you know those two basic signals, spotting and understanding a Harami Cross candlestick pattern should be a cinch. This signal resembles the classic Harami, except the very small second candle of the Harami is replaced by a simple doji that resembles a cross sign. Depending on the price movement and the current trend, the Harami Cross can be bullish or bearish. However, no matter what its color and no matter what its trend, do not risk ignoring this pivotal pattern.
Harami Cross Candlestick Pattern
Formation
Do you think that you have spotted a Harami Cross candlestick pattern? Are you sure that it’s not a basic Harami? To check that you’ve found the real deal, look for these essential characteristics:
First, there should be an uptrend or a downtrend in progress. Second, a candle must appear that continues the trend’s direction. Third, the second candle must be a doji. Fourth and finally, the doji must be contained within the first candle’s real body.
That’s all there is to it! If the first candle is white and follows an uptrend, the pattern is a bearish Harami Cross. If the first candle is black and follows a downtrend, the pattern is a bullish Harami Cross.
Meaning
Of course the big question is: what does a Harami Cross convey to investors? The answer depends, of course, on whether the signal is bearish or bullish . . .
With a bearish Harami Cross candlestick pattern, which is often found at the top of the market, you can see that an uptrend has been in progress and that trend continues with the first candle. The bulls drive the price higher, which creates that long white candle. However, this is followed by a doji, which signifies indecision. The price has stalled and neither the bear nor the bulls are in control. You can expect to see sideways congestion or a reversal after you spot this candlestick pattern.
A bullish Harami Cross, often found at the bottom of the market, conveys the opposite sentiment. A downtrend has been in progress and this downtrend continues, forming the first (black) candle. A doji then appears, representing the investors’ indecision, and neither the bears nor the bulls are able to dominate. Again, you can expect to see sideways congestion or a reversal after you spot this candlestick pattern.
Examples
Ready to test your newfound knowledge? Use the examples below to further explore the Harami Cross candlestick pattern. Two examples are bearish and two are bullish. By viewing the Harami Cross in “the wild,” you can prepare to confront the pattern in the real world. Try to spot and interpret the pattern on your own before relying on the blue arrows and explanations.

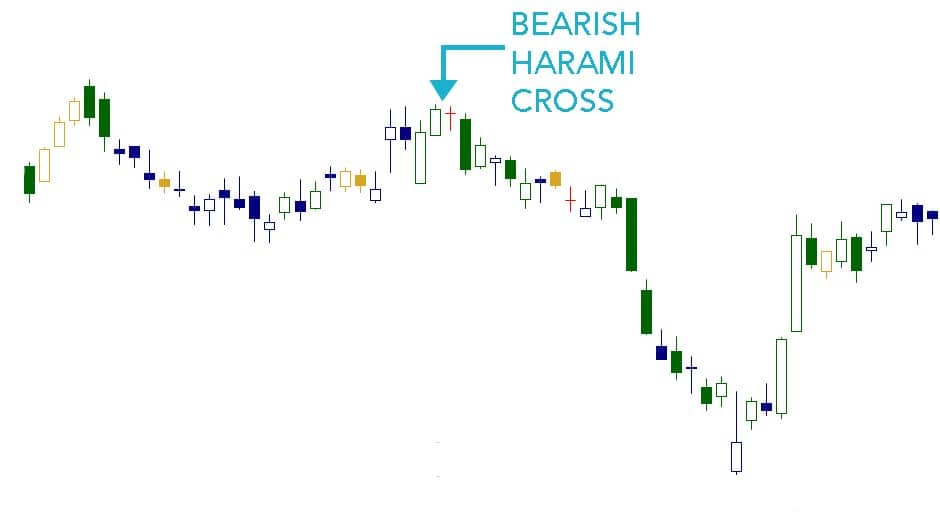
Example 1:
In this first example, the bulls meander in an uptrend, occasionally letting the bears dip the price downward before they seize the reins again. At the end of the uptrend (which happens to land at the end of the session), a bearish Harami Cross appears. The bulls push the price a bit higher, but their upward thrust is followed by a period of indecision. The uptrend will likely conclude with the doji, either moving sideways or downward after that.
Example 2:
This second example begins with a wave-like motion, softly moving up and down. At the peak of one of the waves, a bullish candle is followed by a doji, forming a bearish Harami Cross. As you might expect, the price gradually drops after that. You can thank the bearish Harami Cross for warning investors about the downtrend!
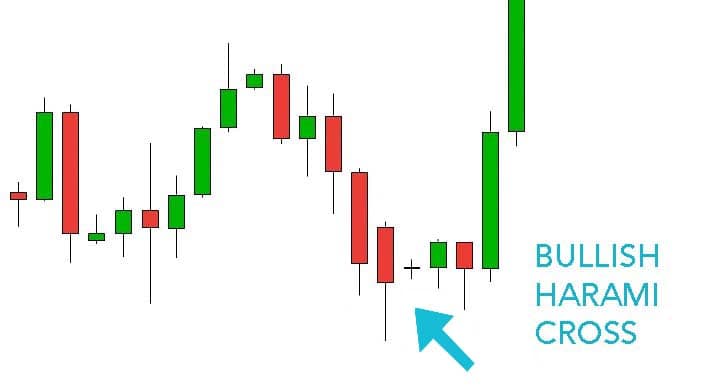
Example 3:
We’ve heard enough from the bears, eh? In this bullish Harami Cross candlestick pattern, a short downtrend is followed by another bearish candle. Then, a doji appears, signifying a period of indecision. Neither the bulls nor the bears can get a firm grasp of the price, so the period closes at the same price that it opened. The market sidles along after that, moving sideways with two short candles. The indecisiveness ends when the bulls take the reins and propel the price upward.

Example 4:
After the second major price plunge in our fourth example, a doji follows the last bearish candle, forming – you guessed it – another Harami Cross. As you have learned, Harami Cross patterns tend to precede sideways movements and uptrends. In this example, the price immediately jumps upward with a long bullish candle. The succeeding uptrend extends quite far, making up about half of the overall chart.
Confirmation
As always, we recommend that you confirm the Harami Cross candlestick pattern before making any rash decisions. For a bullish Harami Cross, check that the price trades above the pattern, and for a bearish Harami Cross, check that the price trades below pattern. In addition, remember that a Harami Cross can predict sideways movement or a complete reversal. So before you make any major decisions based on the appearance of a Harami Cross, note that this isn’t the most predictable of candlestick patterns. Although you can use its presence to gain a better grasp of investors’ sentiments, you may not want to risk your livelihood on the Harami Cross’s forecast.
Good luck!
If you’re interested in mastering some simple but effective swing trading strategies, check out Hit & Run Candlesticks. Our methods are simple, yet powerful. We look for stocks positioned to make an unusually large percentage move, using high percentage profit patterns as well as powerful Japanese Candlesticks. Our services include coaching with experienced swing traders, training clinics, and daily trading ideas. To sign up for a membership, please click here.


Comments are closed.